
20 July 2011
Go Taylor!
My friend Taylor recently took her very first sewing class in which she made this VERY FABULOUS pillowcase!
 Great job Ms. Taylor! Am I looking at a young sewing diva in the making? We shall see! Looking forward to seeing more from you toots! *kisses*
19 July 2011
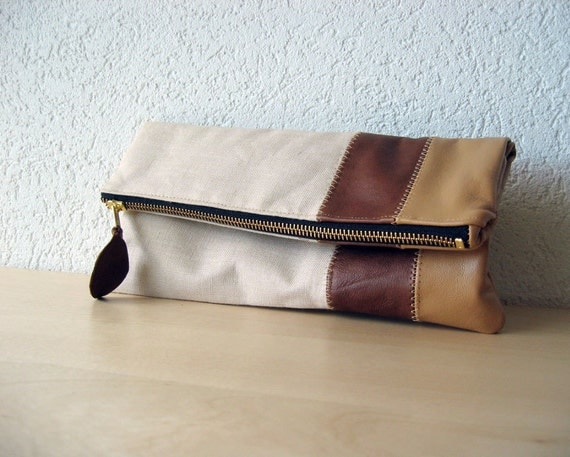
"Knockoff" Fold-over Clutch
I was combing the web trying to find a tutorial on how to put a zipper in a purse (so far I've been skating by on magnetic snaps). Someone mentioned Ira Grant in their blog and I found Ira's Etsy shop. She has gorgeous AMAZING bags but one in particular I fell in love with was her fold-over clutch.
![]()
18 July 2011
All that glitters is NOT gold - sometimes it's PURPLE!
I was commissioned to make this bag as a birthday gift. This is made from Amy Butler's "Birdie Sling" pattern. I neglected to take pics of the lining. But as you can see the outside is this really cool purple glittery something or other. I was concerned about using a fusible interfacing but it worked out okay.
If I had it to do over, I would use a sew-in interfacing. But I didn't have any and I waited until the 11th hour to start on it. SOOOOOOOOO.....as Tim Gunn says MAKE IT WORK.
It worked.... The birthday girl loved it!
![]()
If I had it to do over, I would use a sew-in interfacing. But I didn't have any and I waited until the 11th hour to start on it. SOOOOOOOOO.....as Tim Gunn says MAKE IT WORK.
It worked.... The birthday girl loved it!

Yoo Hoo! Remember me?
That's what my "not-gonna-be-a-plain-jane-no-mo" fabric purchase was saying as I pulled it out of my fabric stash last weekend. It had only been sitting there collecting dust since oh.....February? *smh*
![]()

26 April 2011
(After) Women's Day Dress
So Women's Day at my church was Sunday April 17 (Yep! Past tense). The colors were blue and white so I decided several months ago that I would attempt to make a dress. I found a blue/white print fabric that was pretty interesting (which was a stretch for lil ole miss plain jane).
Things were going pretty good but I hit a busy couple of weeks and couldn't find much time to get in the craft room. Between pre-women's day activities. And oh the small issue of having to move everything out of the craft room unexpectedly so it could be painted... Well I was up at midnight on Saturday night and I just decided I was tired of fooling with it. So I implemented PLAN B. I went down to the basement and pulled out my white suit, threw a blue lap scarf in my pocketbook and went to bed.
I won't call it a complete failure because this was quite a few firsts for me. It was my first time ever making a dress (although I have made a couple of skirts). It was also my first time making a lined garment. My first time following a Vogue pattern (V1183). And it's soooooo close to being done. It really just needs a little fitting and if you look very closely you'll see it's not hemmed.
I'll finish it some day soon. But for now, there she hangs....

23 March 2011
For The DIY Bride - Semi-Pocket Fold Invitations
I made up the name "semi-pocket fold". Call them what you like. LOL!
I was really fascinated with the trend of pocketfold invitations.
 But with an initial guest list of over 350, my rough calculations put the total at around $800 just for materials. I just couldn't see it happening. I visited a local bulk paper store with full intentions to make my own (or at least attempt to). One of the workers showed me this neat idea and that's what I went with.
 It doesn't have a flap over the front to create a folder. But it DOES have a pocket on the back for inserts and that serves the purpose.
This was my very first DIY project and I really wished I'd waited because I found graphics I liked much better later during the planning process but no way was I about to redo 100 invitations.
So basically you have a 5x7-inch invitation with a 2.5 inch (I think) pocket on the back to put your inserts in.
To Make the Pockets
I took my black letter-sized cardstock to Office Max to have it cut to 5x9.5 (7 inches for the front of the invitation and 2.5 inches for the pocket on back. If you want a different size pocket just change your measurements accordingly). As much as I love to save money I'm also all about the shortcut. They cut the whole stack at one time in a couple of minutes and it costed less than $5. (Kinko's provides the same service and the prices are usually about the same).
If you go to a copy center to have your cardstock cut, ask them to save the scraps! Otherwise they'll throw them away. If you plan on doing other projects, those strips of paper may come in handy. Besides, it's yours. You paid for it!
Using the scoring blade on my paper trimmer, I scored a line 2.5 from the bottom edge, applied double-sided adhesive to the left and right edges and then folded the pocket up at the score line.
To Make the Invitations
I designed my invitations to be 4.5 x 6.5 inches because I wanted to leave a black border around the edges. If you don't care to have a border then just go with 5x7 inch invitations. I relied on Office Max for the printing and cutting.
IMPORTANT THINGS TO REMEMBER
1. These invites can get pretty heavy - especially if you add several inserts and put embellishments on the invitations. I recommend doing a mock invitation and put it in the envelope and take it to the post office to be weighed. If you are using inner and outer envelopes take EVERYTHING to be weighed. If it weighs over an ounce you'll end up having to use $.60 stamps.
2. Carefully plan out every single detail before finalizing your design. Make sure you're able to find envelopes the correct size/color. You'll want your envelopes to be at least 1/4 inch larger than your invitation. It's much easier to adjust the size of your invitations in the beginning rather than after they're all assembled.
Ok that's all I can think of for now. Hope that helps someone. If I think of anything else I'll update. And certainly feel free to ask if you have any questions.
~m
I was really fascinated with the trend of pocketfold invitations.
This was my very first DIY project and I really wished I'd waited because I found graphics I liked much better later during the planning process but no way was I about to redo 100 invitations.
So basically you have a 5x7-inch invitation with a 2.5 inch (I think) pocket on the back to put your inserts in.
To Make the Pockets
I took my black letter-sized cardstock to Office Max to have it cut to 5x9.5 (7 inches for the front of the invitation and 2.5 inches for the pocket on back. If you want a different size pocket just change your measurements accordingly). As much as I love to save money I'm also all about the shortcut. They cut the whole stack at one time in a couple of minutes and it costed less than $5. (Kinko's provides the same service and the prices are usually about the same).
If you go to a copy center to have your cardstock cut, ask them to save the scraps! Otherwise they'll throw them away. If you plan on doing other projects, those strips of paper may come in handy. Besides, it's yours. You paid for it!
Using the scoring blade on my paper trimmer, I scored a line 2.5 from the bottom edge, applied double-sided adhesive to the left and right edges and then folded the pocket up at the score line.
To Make the Invitations
I designed my invitations to be 4.5 x 6.5 inches because I wanted to leave a black border around the edges. If you don't care to have a border then just go with 5x7 inch invitations. I relied on Office Max for the printing and cutting.
IMPORTANT THINGS TO REMEMBER
1. These invites can get pretty heavy - especially if you add several inserts and put embellishments on the invitations. I recommend doing a mock invitation and put it in the envelope and take it to the post office to be weighed. If you are using inner and outer envelopes take EVERYTHING to be weighed. If it weighs over an ounce you'll end up having to use $.60 stamps.
2. Carefully plan out every single detail before finalizing your design. Make sure you're able to find envelopes the correct size/color. You'll want your envelopes to be at least 1/4 inch larger than your invitation. It's much easier to adjust the size of your invitations in the beginning rather than after they're all assembled.
Ok that's all I can think of for now. Hope that helps someone. If I think of anything else I'll update. And certainly feel free to ask if you have any questions.
~m
10 March 2011
For The DIY Bride - Damask
I really spread my DIY wings while planning my wedding because....well because I'm cheap. I want what I want but I like to part with as little of my money as possible. Here's some of the DIY projects I did. I'll continue to post more as I find the time.
I've seen these runners sold on etsy for no less than $15 each. At $15 each for 25 tables, it would have cost nearly $400. I spent roughly $125 on fabric, purchased a sewing machine (which paid for itself very quickly) and made them myself.

Table Runners
I used a damask fabric called "Madison" purchased from fabric.com. There is an exact fabric with a larger pattern repeat called "Traditions". fabric.com doesn't carry Traditions but it's easily found on other online fabric retailers by googling.I've seen these runners sold on etsy for no less than $15 each. At $15 each for 25 tables, it would have cost nearly $400. I spent roughly $125 on fabric, purchased a sewing machine (which paid for itself very quickly) and made them myself.
04 March 2011
Bright Baby Blanket - To Azmera With Love
I found this awesome pattern by way of Angry Asian Creations blogsite. The original pattern is for a throw. She modified it and made it larger to fit a bed. I made it a bit smaller to make a baby blanket for my adorable niece Azmera. How precious is she!

01 March 2011
Meet The Craft Room
As I said in my initial post, I actually DO have a craft room. However it needs quite the face lift and mucho organization is required. I've been procrastinating on getting started. I did remove the top layer of wallpaper border that was in there. I neglected to take a pic before I did this so you'll just have to take my word for it. This is a very small room - maybe 10x10 tops so space is at a premium.
Jamie over at Prudent Baby posted last week about giving her craft room a face lift and solicited her readers for advice. I will most definitely be sifting through the comments and maybe I'll find some ideas to incorporate with ideas I already have.
Jamie over at Prudent Baby posted last week about giving her craft room a face lift and solicited her readers for advice. I will most definitely be sifting through the comments and maybe I'll find some ideas to incorporate with ideas I already have.
08 February 2011
Repentance
When my darling husband saw how much I spent at Joann's this weekend he said "You need to go on your blog TODAY and repent". Well I'm a few days late (and a couple bucks short) but in the interest of being a good obedient wife :) I'm repenting.
I really didn't buy THAT much. Just a few patterns and a couple pieces of fabric (and some thread. lots & lots of thread. It was on sale).
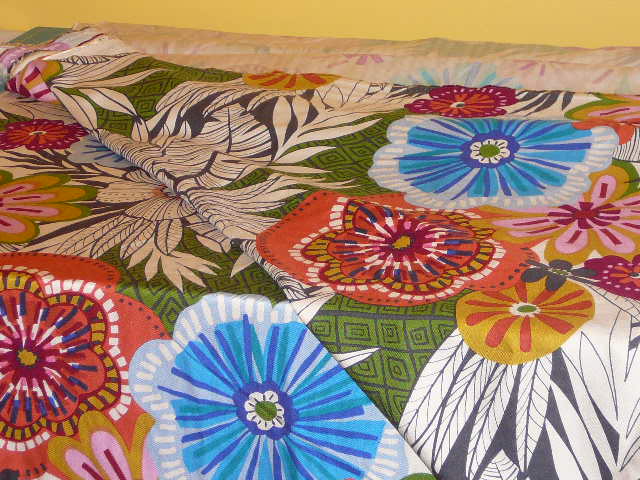
You know you've spent too much time in the fabric store when you can immediately recognize new fabrics lol! I'm super excited about this lovely print I found.
 It's really a stretch for me as I am a self-proclaimed Plain Jane and tend to stick to solids. But I thought this would make a great sundress or maxi dress for summer.
I really didn't buy THAT much. Just a few patterns and a couple pieces of fabric (and some thread. lots & lots of thread. It was on sale).
You know you've spent too much time in the fabric store when you can immediately recognize new fabrics lol! I'm super excited about this lovely print I found.
03 February 2011
So What's With the Name?
Inez is my middle name which I absolutely HATED my whole life. I always thought it was an "old lady" name. Which my mom confirmed when she told me I was named me after some old lady named Ms. Inez who was nice to her when she was pregnant with me. So noooooooobody else was nice to her right? It didn't help that one of my classmates grandmother's name was Ms. Inez. Anywho I finally embraced it when I reached my 30's. All of a sudden it seemed "mature". So that's the first part.
I'm always being teased that I have "old lady" hobbies. Apparently there's an age requirement for crocheting, knitting & sewing and I haven't met it yet. So anyway, that's that.
When trying to decide on a name for my blog, it only made sense to throw the old lady components in there. So that's how I arrived at Inez's Craft Room. Clear as mud? Good!
I do actually have a craft room but I'll tell yall about that later!
Subscribe to:
Posts (Atom)